vanbuild; phase I
A few of you have been requesting blog
posts for this new adventure i've started & although i'm not
committing to weekly updates, I'll do my best to keep you posted..
I might as well start at the
beginning..
There were several reasons why I wanted to
try out vanlife, the biggest and simplest one being and I do not know
where I want to live.. ruling out one city leaves me with a lot of
options! I did a lot of research and planning this past winter and
really had my heart set on a Sprinter high-top cargo van, but it is
really difficult to find a used one so when a friend said he could
get me a good mini-van (as the days kept slipping past and the snow
kept piling up) I jumped on the opportunity and put the sprinter on hold..
 January 31st I picked up my
mini-van & drove it home to begin the work! I took the seats out
and gave it a thorough cleaning to start, took some measurements,
then had the next 3 days at work to day-dream about how I was going
to build it..
January 31st I picked up my
mini-van & drove it home to begin the work! I took the seats out
and gave it a thorough cleaning to start, took some measurements,
then had the next 3 days at work to day-dream about how I was going
to build it..
I figured out that for my bed to be
relatively level while my van was parked on level ground, I would
need the base to be 3” higher in the front than in the back. I
sat cross-legged on the floor and measured how much space was above
my head to determine how high to make the base. Monday morning I got
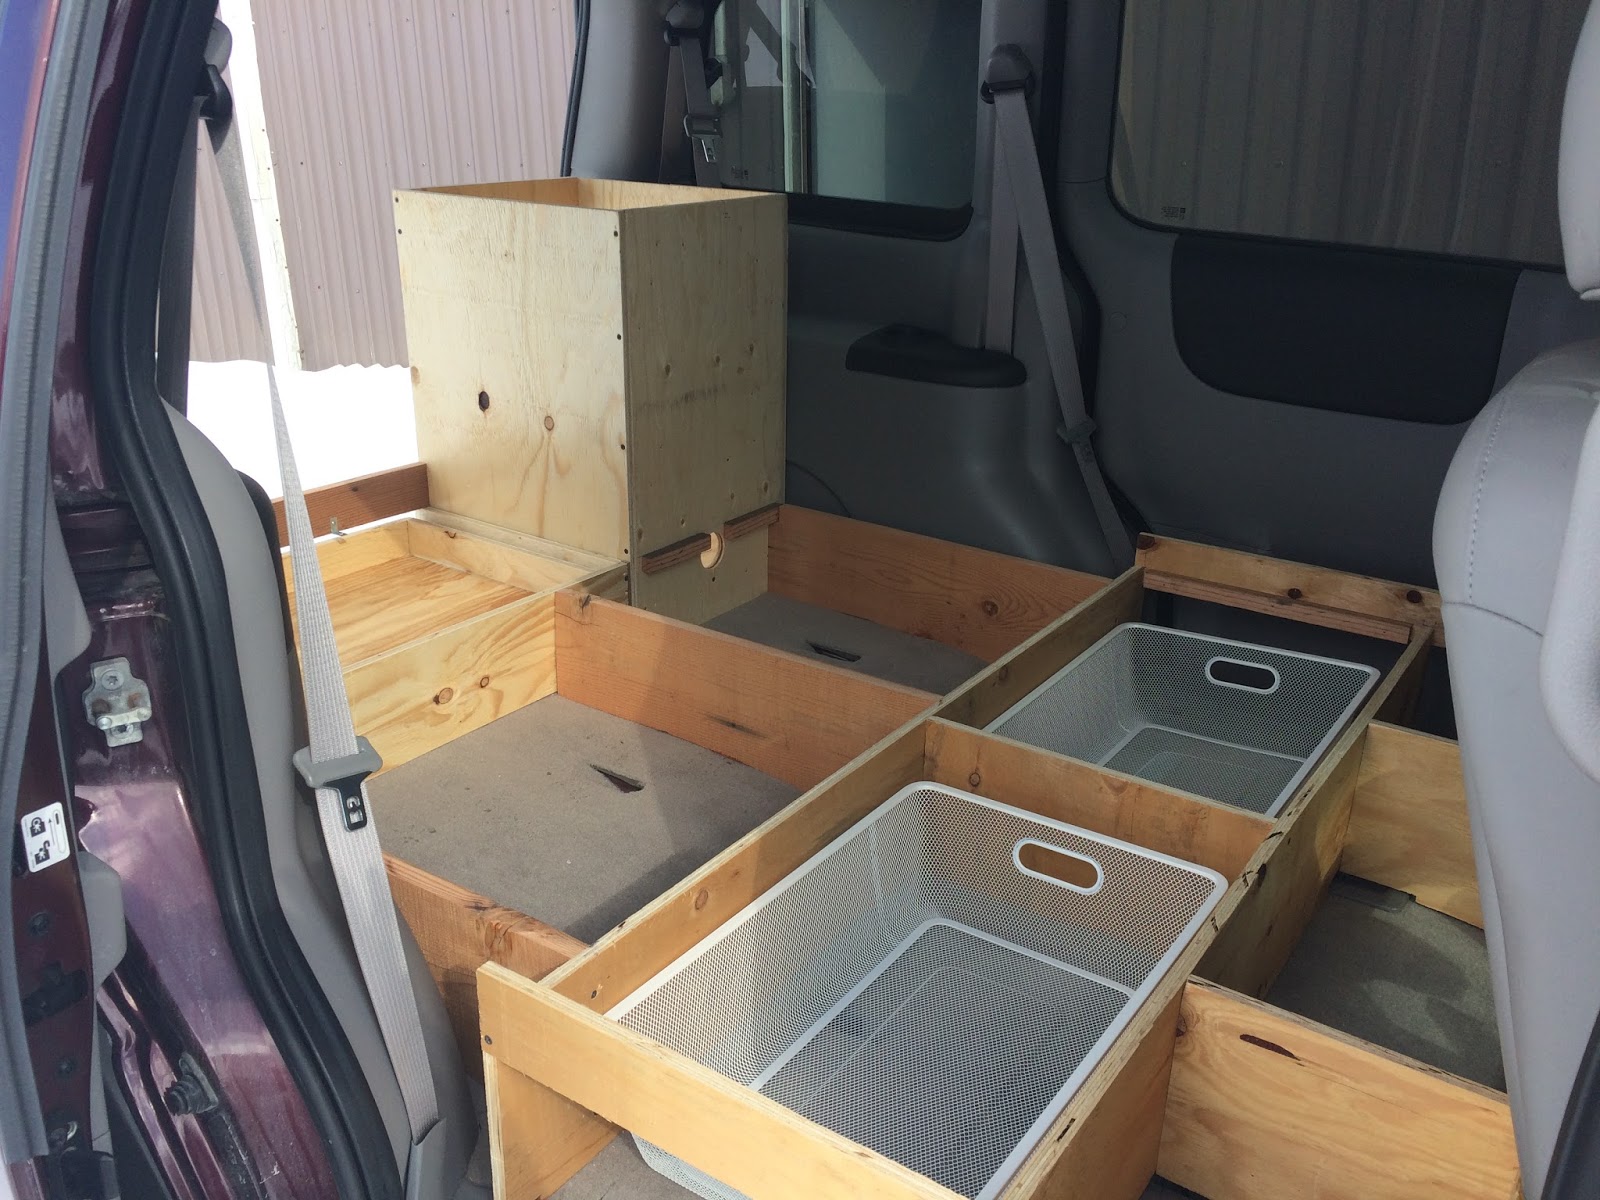
to work building the section behind the front seats which would be
accessible from the sliding side doors. I got a couple baskets from
IKEA which would be my main clothes storage, and used smaller baskets
for the smaller front cubbyholes. I built a narrow section running
across my van directly behind the seats which is divided into 3
sections; the two outer sides are accessible from each side door for
shoes and other small items, and a cubby in the center is accessible
from the front between the front seats. Behind the narrow section is
a slightly wider section running across the van and divided in two.
This fits the larger clothes baskets and is more than enough space
for a variety of clothes. The floor of my van has lots of humps and
bumps from the seats, so there was lots of cutting and shaping to get
everything fitting right.


With my fridge cabinet in place, the next order of business was to fill in the rest of my bed-base while making the space as accessible and functional as possible. I decided to make a drawer across the back which would hold some kitchen things & set about building my first ever drawer. My base is only 6” high at the back, and the lip is 3” high, so that left me with a 3” deep drawer.. pretty shallow, but still useful for cutlery and things like that. I made it 18” deep and it spans the width of the remaining back opening. I didn't quite get my cabinet square the first time around, so it took a little adjusting, but eventually I got there and my drawer worked really well! I slid it in and out about 20 times and it still makes me smile.. it's the little things :) especially when it's -15 and you're working in an unheated shop tromping through snow back and forth to the van to measure things up.. this was a big victory!!


With the front-sliding-door space successfully used and the back-door space successfully used, I filled in the gap between the two by making 3 supports running lengthwise in the van, creating two cubbyholes in the centre of the van which I would use for things i don't need as often. With my base secured and level, the next step was creating a solid base for my mattress to sit on. I wanted this to be as solid as possible, so I cut a 4 x 8' sheet of plywood to the right length, but it still left me with a very large piece of wood to be cutting curves in to fit the contours of the van. I've since learned that there would have been far easier ways of accomplishing this task, but I got 'er done. I needed to add a narrow strip to the one side to complete filling in the base, but it was much smaller and easier to handle cutting.

With my base in place, I was able to head to the foam shop to get a mattress cut to the right size. I got a 4” memory foam mattress and then sewed up a cover for it. Then I was able to start organizing my things and moving into my van! I got a couple suction-cup baskets for the back windows, another wire basket to hang on the bed-side of my fridge cabinet and sewed up some curtains for the windows. For the sliding door windows I made contoured pieces which hang on little suction cups and can be easily removed. The inside is a really nice light grey, and the outside is black so that from outside the van it simply looks like a it has a dark tint. I did a similar curtain for the back window, except that it stays in place with velcro.

 Once I started loading up my van, I
realized that I did not have enough kitchen storage, as I couldn't
fit any pots or pans in my drawer. I decided then to add a shelf
that would run across the back from the top of my fridge over to the
far side, leaving lots of space for my feet while i'm sleeping and
still keeping my back window clear for easy driving. With a couple
baskets, the shelf is wide enough for a water jug, some pantry items
and my pot & pan!
Once I started loading up my van, I
realized that I did not have enough kitchen storage, as I couldn't
fit any pots or pans in my drawer. I decided then to add a shelf
that would run across the back from the top of my fridge over to the
far side, leaving lots of space for my feet while i'm sleeping and
still keeping my back window clear for easy driving. With a couple
baskets, the shelf is wide enough for a water jug, some pantry items
and my pot & pan!
I later realized, when i was loading a
few more things into my van, that the legs holding up my kitchen shelf now
prevented me from being able to lift the large section of my bed
base, and therefore prevented me from being able to access one of the
middle cubbyholes (where i'd stashed all my tools, booster cables,
etc.) Unsure of how to solve my dilemma and not wanting to delay my
departure, I left anyway and said my prayers that I wouldn't break
down & need any of those things – otherwise i would be emptying
and dissembling my van on the side of the highway! (.. spoiler
alert.. it didn't happen!) I hit the road with my mostly-outfitted
van on February 16th to start my adventure!
- J


Comments
Post a Comment